Removing the Roof Lining
One of the issues with the early model FTO's was the glue used to fill the gap between the sub-frame and the roof skin. In the 94/95 FTO, this glue has a tendency to hold water, causing the roof to rust out over time. This guide takes you through the process of removing the roof lining and then removing the glue.
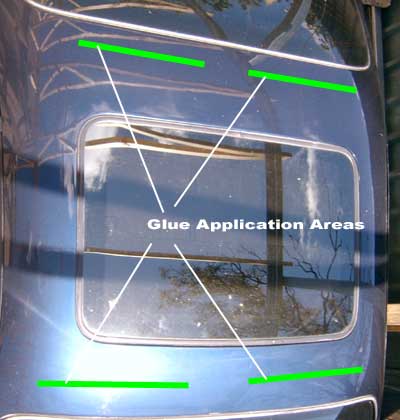
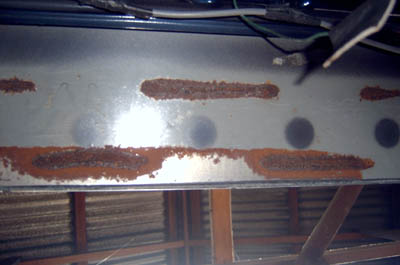
The following illustration demonstrates where the glue was applies (and thus where the rust occurs)
The process of removing the roof requires the following items:
- 10mm and 12mm Socket
- Medium Phillips head screw driver
- Medium Flat Head Screw Driver
- 1 Coat Hanger
- 1 flat piece of metal (about width of a ruler)
- Rust Converter
- Drill with 4 cm wire brush attachment (the circular ones you get from the hardware store)
- 5mm Drill bit (For those that are serious)
Step 1. Remove the Sill Covers. There is one on each side of the car. There are 5 clips underneath each. Slide a flathead screwdriver beneat each clip to pop it. Do not use force (these clips can break). The illustration below shows the location of the clips:

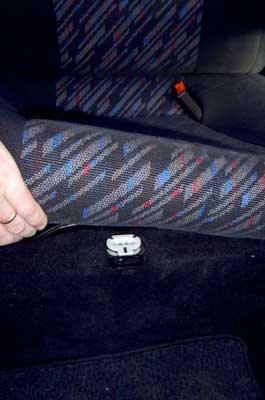
Step 2. Remove the lower portion of the rear seat. This can be achieved by pulling the 2 clips that are positioned on the lower front of the seat (as shown below).
Step 3. Remove the upper portion of the rear seat. Use the 12mm socket to release the 2 bolts that are holding the bottom of the rear seat down. One of these is shown below.
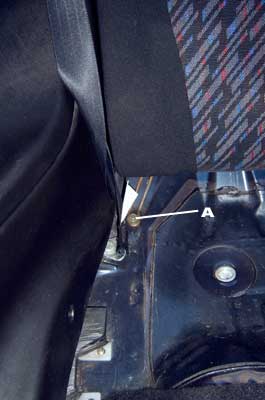
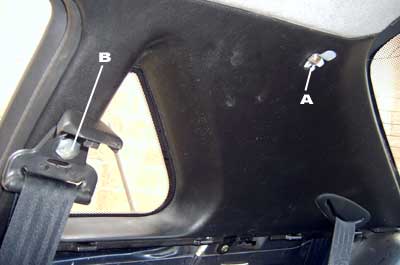
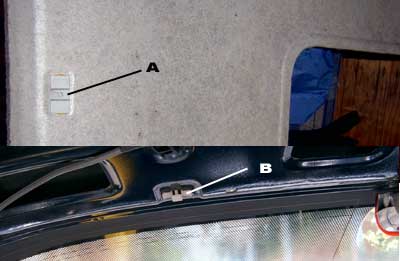
Step 4. Remove the 2 screws marked A and the clip marked B on the illustration below. To remove the clip, slip the flat head screw driver beneath the clip and lever it up. Do this to both sides.

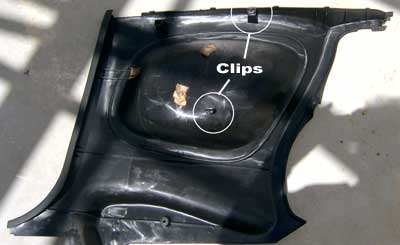
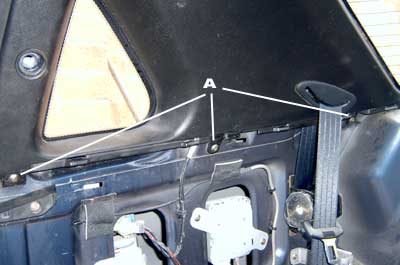
Step 5. There are 2 clips behind each side. The diagram below illustrates their location. Pop both clips (on each side) and remove lower panels by sliding toward the front of the car.
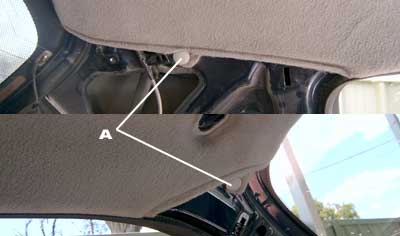
Step 6. Remove the rubber coat hanger (sits on bracket marked A below) by pulling it up toward roof. Then remove the screw that is exposed (marked A).
Step 7. Lift the flap on the top of the seat belt and remove the large bolt that is underneath (marked B).
Step 8. Next, remove the 3 screws marked A in the illustration below.
Step 9. This part has 3 clips on the back of it. The illustration below shows their location. Pop each of these and let the part dangle off the seat belt. You will not be able to completely remove it as the rear seat belt runs directly through it. Repeat process for the other side.

Ok, now lets move to the front of the car.
Step 10. The A pillar cover has 2 clips and a plastic lug that locates it on the pillar (shown below). Pop both clips and remove the pillar cover by pulling up towards roof. Repeat on other side.

Step 11. Remove the sun visors and their holders by removing all the associated screws.
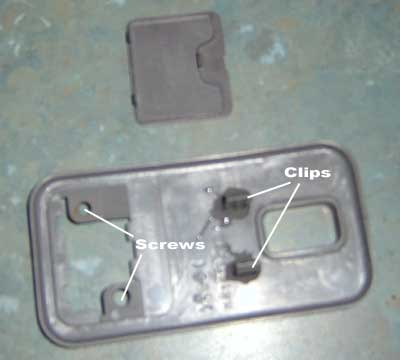
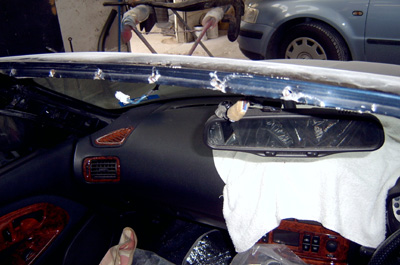
Step 12. If you have a sunroof, remove the sunroof switch cover. The illustration below shows where it is attached. Remove the small cover, then the 2 screws underneath and finally, push the clips together and the cover will come off. Be careful with this as it can break (I broke mine as can be seen in picture below).
Im not sure if there is anything else to remove at this stage in the non-sunroof FTO, but if there are internat lights that I havent mentioned, remove these now.
Step 13. Remove rear brake light. To do this push the centre of the clip (marked A below). You should now be able to remove the cover.

Step 14. Remove the 4 clips holding each corner of the roof lining in. Front and rear clips are shown below. Use the flat head screw driver to lever them up.
Step 15. The only thing holding in the lining now are the 2 clips shown below. To pop these pull the lining toward the front of the car. be careful, the lining is cardboard and will crease if you are not careful.
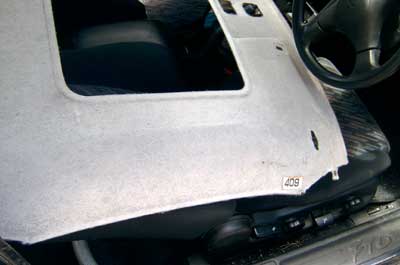
Step 16. To remove the lining from the car, recline both seats fully and remove lining below steering wheel as shown below.
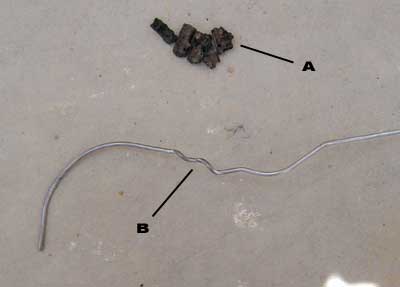
Ok, now for the rust. The picture below shows some fragments of the petrified glue complete with rust. I found that a coat hanger was extremely effective at removing the glue shown in the wide strips at the front and back of the roof. The shape shown below enables you to push out the glue. It can also be moved from side to side between the sub frame and the roof. Eventually, you should be able to pass the coat hanger from one side to the other without removing it. After you have removed all the glue, use the wire brush attachment on the drill to remove any flakey rust (be careful not to put dents in your roof doing this) and then hit it with some rust converter.
If you have a sunroof, there is also glue under the subframe surrounding the sunroof itself. To get at this you will have to remove the sunroof itself. There are a couple of screws that need to be removed that hold in the sunroof switch and a bolt under that that holds in the sunroof motor. After that, remove the 3 nuts down each side of the sunroof and it should end up dropping into your lap.
WARNING: Be careful when carrying out the following to not put dents in your roof.
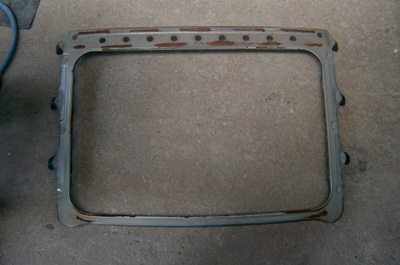
You are now in a position to be able to remove the rust. Bend the piece of metal to about 70 degrees and slide it under the subframe moving it back and forth to remove the glue. To do this right, you would have to drill out the 5 or so spot welds on either side of the sunroof hole and the ones along the front. I had this professionally done (pictures of the drilled out holes below:
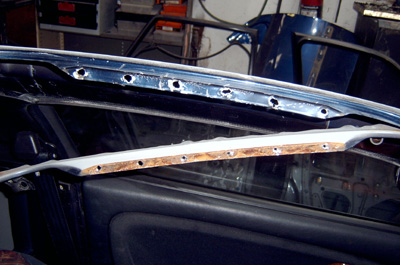
This should result in the subframe landing in your lap. The pictures below show the distinct lines of rust where the glue was applied:
And these are the corresponding lines on the roof skin:
These need to be cleaned up to remove any loose rust, neutralised, undercoated and then the subframe needs to be welded back in place.
And thats about it, follow the reverse process to put everything together again.I actually had quite a bit of trouble getting the clips in step 15 back together again. The easiest way to do this is to remove the clips from the roof, attach them to the slots in the lining and simply press the lining back in (I originally tried to push the lining back into the clips).
Good Luck and I hope your rust isnt too bad.