Changing the Dash Lighting Colour
NOTE:This guide originated from the Hostile Smoker site, but is not longer available. For this reason, it has been moved here!
Well I colour coded everything else inside the car so figured I might as well do the dash lighting too. As with all lighting (neons etc.) red is probably the dimmest colour which doesn't really help, blue / green are probably the brightest options.
|
1. First step is to prise up the bottom part of the console / gear surround. The best method is just to use your fingers so you don't mark it.
There are clips at either side where the edge straightens (circled) which just pull out (I grabbed the inside of the gear gaitor to get a good grip and just pulled). | 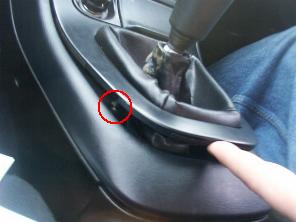 |
2. Next are a further 2 clips on each side (circled), again they just pull out but be carefull not to snap the plastic - especially the frame around the stereo.
Now unplug the wires from the back of the surround which are connected to the lighter and a light inside the ashtray.
At this point you may remove the 2 screws which hold the gear gaitor in place, I just folded it over out of the way. | 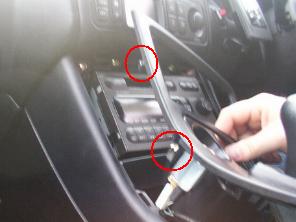 |
| 3. The top section of the centre console is simply held in place by these 2 screws (circled), once removed the top section can be pulled towards you and is free from the dash - be carefull though as the instrumentation is fairly closely wired so will need disconnecting before you get too much access. | 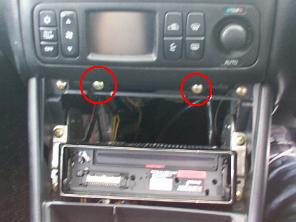 |
4. The 2 centre guages (battery voltage & clock OR oil temp & vac guages) are held in place by a metal frame which in turn is held in by 3 screws - 1 at each side of the frame (circled) and one in the centre.
Once removed the guages will be free of the centre console. |  |
5. The aircon control is held in place by a metal frame which is screwed into the centre console in 4 places (circled / arrowed) & is held to the aircon controls in 4 places (circled).
Once these screws are removed the centre console itself will be free to be removed, the aircon controls can also be disconnected and removed. | 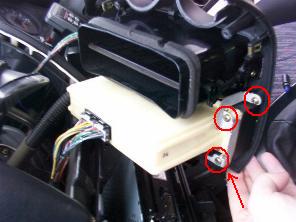 |
6. This picture shows the back of the centre guages, the design differs on each guage but ultimately there are 2 bulb holders (1 shown) which can be removed using a flat-head screwdriver, these bulb holders may (as in the picture) be hidden under a small circular cover which can just be prised off.
These bulbs are held into the bulb holders by their wires which are wound around the holder (it's easy to work out when you see them), all I did was unwind them and replace them with the bulbs I had ordered from Maplin (listed as coloured sub-miniature bulbs). The new bulbs fitted in the same way and worked with no problems. | 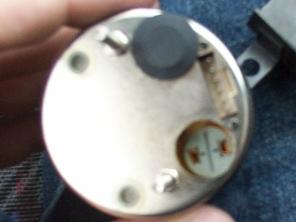 |
7. The same type of bulbs are used in the aircon controls, there are 4 bulb holders (circled) located on the underside of the circuit board.
Access to the circuit board is by removing the 4 screws holding the instrument face in place and also on climate control models removing the temp/auto knob (it just pulls off).
I tried replacing these bulbs with the same sub-miniature bulbs from Maplin but found they were nowhere near bright enough (even when using 4 or 5 in a bunch). I then tried using LEDs (with resistors) but suffered from light spots. The best result by far came from using coloured bulb paint (available from Halfrauds) on the original bulbs. |  |
| |
1. To access the main dials, first locate and remove the 2 screws (circled) which hold the plastic surround in place.
Unplug the back of the foglight & ariel switches if you have them - the lighting in these can also be changed (see no. 4 further down the page) | 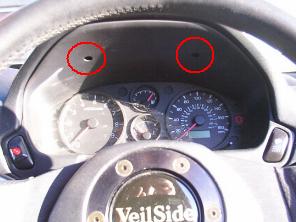 |
2. After removing the plastic surround, locate the 4 screws (circled) holding the main dials in place.
The dials can now be removed from the car, they are not plugged into anything, the connection is simply made at the back of the dials, so remove them by pulling from the bottom and pivoting upwards.
You can now retreat to a handy kitchen table to operate on the bulbs. |  |
3. The bulbs which need replacing to make the dials light up a different colour are the 5 larger bulb holders circled.
These bulbs are of a different design to the centre console bulbs, being a snap-in type fitment. The bulbs I used were a direct replacement supplied by another FTO owner but are no doubt also readily available from the likes of Maplin or similar. |  |
| 4. The foglight and ariel switches each contain a miniature bulb, the switch can be pulled apart into 3 seperate sections (as shown) and then the bulb painted using the same bulb paint I used on the aircon controls. | 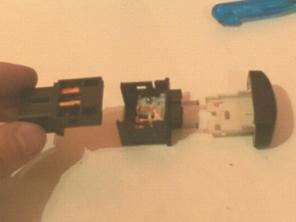 |
All guides are suggested methods only, any modifications or work is carried out at owners risk. Hostile Smoker.com will not be held responsible for any problems or damage caused as a result of following one of these guids. For more FTO workshop guides please visit : FTODIY